Friday, December 30, 2016

American Freedom Softball Albums and Elf Christmas Bags

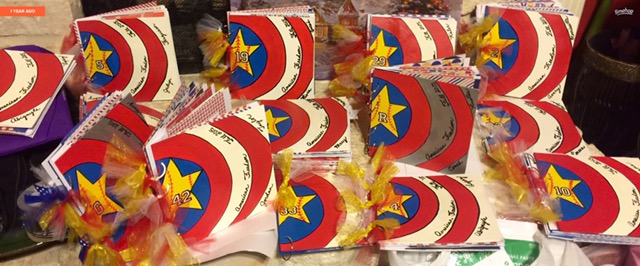
 Here are the little scrapbooks I made for Macy's softball team from last year.  I made one for each girl and one for each of the two coaches.  I went with the Captain America theme...the books look like part of his shield!  lol
 Here is what the front of the album looked like.  The front and the back had a base of just chipboard that I cut out of larger sheets from Michael's.  I glued a piece of white paper down on them(so the colors would show up brightly), then painted them. 
 I punched hoes on the sides, and bound the book with rings and put ribbon on them.

 On the inside, the pages were just white paper, embellished with red white and blue patterned paper, and I embellished lightly!  My husband and I took the pics, as always, so we had plenty shots of each girl!

 Here is the little elf bag I painted for them.  I saw a bag that was similar, and I just drew the image on each bag, then painted them.  I put the album in the bag such that the ribbons on the side of the album ended up sticking up from the bag...made me think of a petticoat on a girl elf!  Also, that is supposed to be a BAT (the blue thing).  It was a funny skinny bat!  lol

Here are all of the bags underneath the tree right before they opened them at their Christmas party last year!

One thing that I added to them last minute were the little bells...to the elf shoes!  I poked a hole in the bag, put the gingle bell hole through the bag hole, then safety-pinned them on the inside, this way, the little bells actually jingled!

Hope you enjoyed looking!
~Shelley

Painted Hutch

 Ok, so I started out with a wood hutch that I had, but that really didn't match my style.  I was afraid to do it, but somehow gathered the courage, and made this happen.  I used the above spray paint!

 Here is the top part of the hutch, and you can still see some of the wood color.

 Here is a little farther along with a drawer on the top.  I painted the inside of the hutch and the inside of the drawers black!

 Here are the drawers being painted...
 Bottom part of the hutch in the middle of the process!

 A finished drawer!
 A little more finished...
 Another drawer!
 The glass part was a bit difficult to manipulate around, but I didn't want any brushstrokes, so I refused to used a brush...went with the spray paint...it was more fun, too!

 I put the original hardware back on the hutch after painting the pieces black to match the inside of the hutch.

 Here is the finished product!  After painting it, I sprayed it with some wax, then rubbed in it...probably using that towel you see in the pic...lol.


Here, I was trying to show how the inside of the drawers looked painted black!  I really loved how they turned out!
Thanks so much for looking!

~Shelley

Football Mum

Freshman cuties!

Let's start out with the finished product!  Here is my son with his beautiful girlfriend wearing the mum that I made for her!  Aren't they precious?!

 Here is a closer pic, although I know it is a bit hard to see, I think because of all of the black items that don't show up too well.  Anyway, the mum itself was white and gold.  I put a little black teddy bear in the middle of the flower.  She had her OWN little mum, and I made it light up!

 I spent quite a bit of time and effort on this one!  I think it was getting borderline gaudy, even then, I put a few more items on it!  ha

 Here is the whole thing, but again, all of the parts aren't even showing up.  I put around 5 lights on it, and it was "lit"!  lol
Thanks for looking!
~Shelley

Football Time in Texas...a football WREATH

 As soon as football season started this fall, I tried my hand at this Football/Mum wreath.
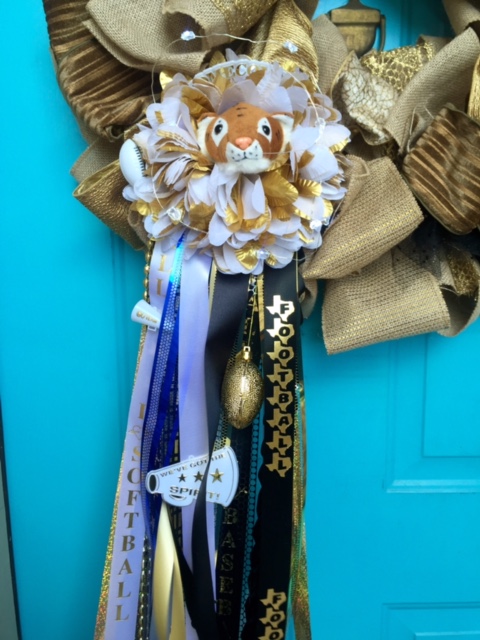
I purchased the base wreath at Michael's with some ribbons already on it.  I added a few more ribbons to get the colors I wanted...Gold and Black...colors for Mansfield High School, where my son attends and plays football!

 I knew I would want something on the wreath to add interest, so I made this small mum to put on the side of it.  I used a little tiger in the middle, and it has lights(you can't see them)!

 I was really practicing up, as I knew my son would be asking his girlfriend out for Homecoming, and that I would get to make her mum.  This one was a small one compared to the one I made her, but it was fun, and I liked the way it looked on our door.

As not to leave my daughter out, I let her put a couple of blue ribbons on the wreath to represent Wester Middle School, also!
 Overall, I was pretty pleased, and I'll be pulling this wreath back out again next year at football time!
Thanks for looking!
~Shelley

Evan's 13th Birthday (Baseball Themed) Party

 My son's 13th Birthday party was a success!  It's been almost two years, so I'm a bit behind in posting these, but I'm trying to catch up, so here goes...
  He had his party at a jump place, which all the kids love.  As far as the decorations go, it means I'm limited to a few tables, but hey, we made it work!
His theme was BASEBALL, which is one of his favorite sports! 

 Here you can see the overall design of the party decorations...a green(grass) tablecloth, baseball balloons ad paper goods!  Pretty standard stuff!

 For a floral arrangement, I made it look like a baseball.   It came off pretty well!  I found the fun coke-bottle bowl at Hobby Lobby and figured this would hold the gum!


 More little containers full of gumballs and other treats!

 This little carrier, I also found at Hobby Lobby.  I did add the flower and the bow.  I used this to hold the treats for the guests...Pop Corn plastic cups from the dollar store...filled with a bottle coke and some other treats!
 I found some cute metal holders that you could write on at Hobby Lobby.  This one held our straws!

 I put some "stress" balls in this container like the other one, and here you can see a picture of the awesome cake balls we had for him instead of a traditional cake.  He loved them!

 Side view of the treat stand...we had some sunflower seeds in there...a boy' fav!

 I think I used the plastic bucket with a chalkboard label to house is presents...which were ALL cards and/or money!  lol


 I got some star shaped glass candy dishes at the dollar store, and some plastic silver scoops at Party City!


The kids had a ball!


Thank you for taking a look!  I hope you enjoyed it!

~Shelley
Monday, December 5, 2016

Mignon Birthday Party

Macy's 10th Birthday Party!  She did Mignons!


I made the little centerpieces out of cut-outs and plastic holders from the dollar store.   I used washi tape and colored tissue paper, also.   I printed out pieces for the little whistles and small discs, too!

Here are the treat bags!  They were pretty easy.  I started out with yellow and purple gift bags, then I just cut out the pieces from cardstock, glued them on, and they were done!

Here is a pic of the little doily-backed pics that I put on the whistles...and I put blue and yellow curly ribbon on practically everything!

Here is one of the little pieces that I put a mignon cut-out on.


Larger gift bags that housed her "real" present!  I did these the same way as the treat bags, but I just started out with larger bags to begin with!  lol

The little girl centerpiece was hilarious.  To make her goggles look real, I covered the part that would be glass with Glossy Accents(a glue)!


I got the little plastic dishes and scoops at Party City!

And before you knew it, it was done!  lol